Get in touch with us today and our team of imaging professionals will be pleased to assist you.
Uploading Custom Plugins to eCapture Pro
Use this procedure to upload a compiled custom plugin to an eCapture Pro server so it becomes available as a processing block when building a pipeline in the Processing View. After a successful upload, the plugin appears under Add Plugins and can be inserted into a processing pipeline alongside built-in processing blocks.
You upload plugins from the Processing View tab. eCapture Pro transfers the plugin file from your workstation to the server selected in the Server drop-down, so select the same server you will run the pipeline on. Make sure the plugin matches the server’s OS and architecture and is compatible with the installed eCapture Pro/eSDK Pro version (*.so on Linux, *.dll on Windows). If the plugin requires external runtimes (for example, CUDA), install those dependencies on the server; otherwise, the upload can succeed but the plugin may not load.
After upload, eCapture Pro stores the plugin on the server’s file system:
- Linux:
<eCapturePro_install_dir>/eSdkPro/plugins - Windows:
C:\ProgramData\EVT\eCapturePro\plugins
You normally do not need to access these directories directly, but they can be useful for troubleshooting or validation.
The same plugin binary can also be used in applications built with eSDK Pro, allowing you to reuse the same custom processing logic in both eCapture Pro pipelines and custom eSDK Pro applications.
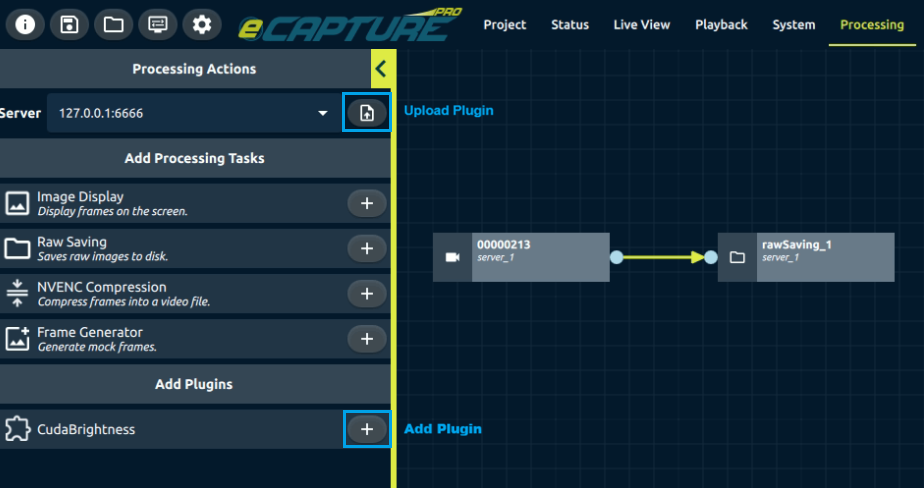
Figure 1. Uploading a custom plugin in Processing View
The Upload Plugin button uploads a compiled plugin to the selected server. After upload, the plugin appears under Add Plugins and can be added to a processing pipeline.
Procedure
- Open Processing View.
- In the Processing Actions panel, select the target Server (for example,
127.0.0.1:6666). - Click the Upload plugin button beside the Server selector.
- Select the plugin file (
*.soon Linux,*.dllon Windows), then click Open. - Confirm success:
- Verify the plugin appears under Add Plugins in the Processing Actions panel.
- Open Status View and verify the log shows Plugin uploaded successfully.
See Also
Get in touch with us today and our team of imaging professionals will be pleased to assist you.